How to Screenshot on Windows
Published on July 8th, 2024

How to Screenshot on Windows using Print Screen (PrtScn) Key
Capturing screenshots on Windows using the Print Screen (PrtScn) key is a simple and quick method. Here's how you can make the most out of this key for various types of screenshots:
1. Full Screen Capture: Pressing PrtScn Key
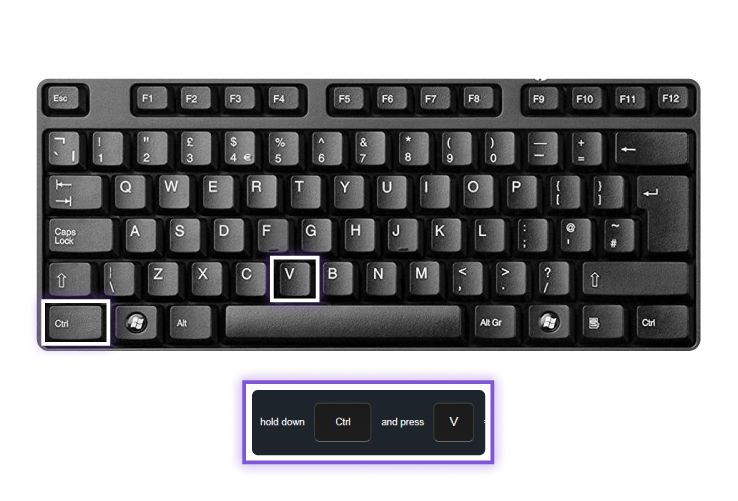
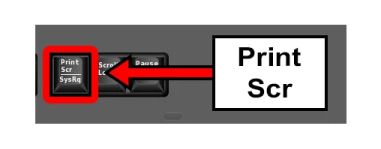
To capture the entire screen, simply press the PrtScn key located at the top row of your keyboard, often near the Function keys (F1-F12). This action copies the entire screen's content to your clipboard. You can then paste the screenshot into an image editor, such as Paint or a document editing tool like Microsoft Word, by pressing Ctrl + V.
2. Capturing Active Window: Pressing Alt + PrtScn
If you only need to capture the currently active window, press Alt + PrtScn. This combination captures only the window that is currently in focus, ignoring the rest of the desktop. Similar to the full screen capture, the screenshot is copied to your clipboard, ready to be pasted into your preferred application for editing or saving.
3. Saving Directly to File: Pressing Windows Key + PrtScn
For those who prefer to save the screenshot directly as a file without the intermediate step of pasting it into another application, press Windows Key + PrtScn. This key combination saves the screenshot directly to your Pictures library, in a folder named "Screenshots." Each capture is automatically named with a sequential number, ensuring your screenshots are neatly organized and easily accessible.
Why Use Different Methods?
Each method of taking a screenshot on Windows serves different purposes. The full screen capture is ideal for capturing everything displayed on your monitor, useful for creating comprehensive guides or tutorials. The active window capture focuses on a single application, perfect for highlighting specific tasks or errors. Directly saving the screenshot as a file is the quickest way to capture and store images without needing further editing.
By understanding and utilizing these various techniques, you can select the most appropriate method for your needs, ensuring that your screenshots are clear, precise, and fit for purpose.
Mastering the Print Screen key and its combinations can significantly streamline your workflow. These built-in features of Windows provide a robust set of tools for capturing screenshots in different scenarios, catering to both casual and professional users alike.
How to Screenshot on Windows
How to Screenshot on Windows using Snipping Tool
The Snipping Tool is a versatile utility built into Windows that allows users to capture screenshots with more control and precision compared to using the Print Screen (PrtScn) key. Here’s a comprehensive guide on how to use the Snipping Tool to its full potential:
1. Accessing Snipping Tool
To access the Snipping Tool, you can follow these steps:
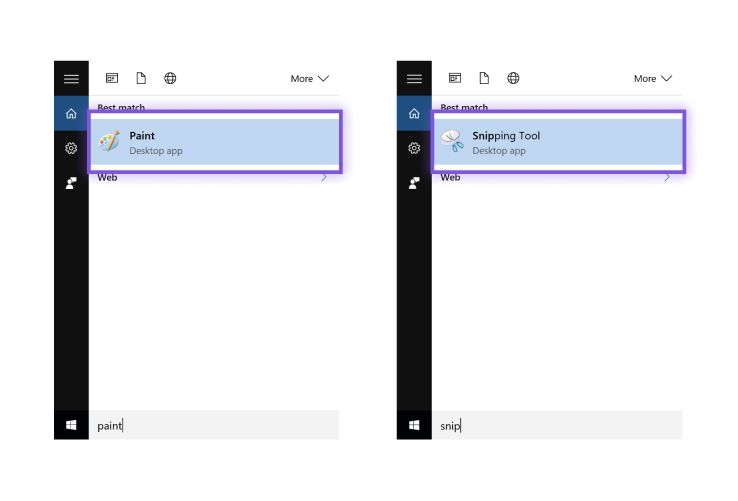
- Via Start Menu: Click the Start button and type "Snipping Tool" in the search bar. Select the Snipping Tool from the search results.
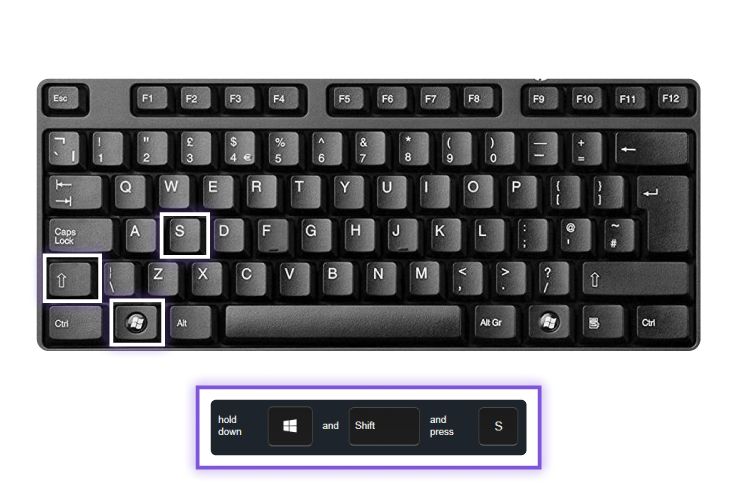
- Using Keyboard Shortcut: Press
Windows Key + Shift + S. This shortcut opens the Snipping Tool in the snip mode directly.
2. Different Snip Modes
The Snipping Tool offers various snip modes, giving you flexibility depending on what you need to capture. Here’s an overview of each mode:
- Free-form Snip: Allows you to draw a freehand shape around the area you want to capture. This mode is perfect for capturing irregularly shaped areas or specific sections of your screen.
- Rectangular Snip: This is the most commonly used mode, where you can click and drag to form a rectangle around the area you wish to capture. It’s ideal for taking uniform screenshots.
- Window Snip: Captures the contents of a specific window. Simply click on the window you want to capture, and the Snipping Tool will do the rest. This is useful for focusing on a particular application.
- Full-screen Snip: Captures the entire screen, similar to pressing the PrtScn key but with the added benefit of immediate editing options.
3. Saving and Editing Snips
Once you capture a snip, the Snipping Tool provides several options for editing and saving your screenshots:
- Editing Tools: After capturing a screenshot, you can use the built-in editing tools to highlight, annotate, or erase parts of the screenshot. These tools are essential for adding context or emphasizing important areas.
- Saving Snips: To save your screenshot, click the disk icon in the Snipping Tool window. You can choose your desired format (such as PNG, JPEG, or GIF) and save it to your preferred location.
- Copying Snips: If you need to paste the screenshot into another application, you can copy it to your clipboard by clicking the copy icon or pressing
Ctrl + C.
Additional Tips for Using Snipping Tool
- Delay Feature: The Snipping Tool has a delay feature that allows you to set a timer before a screenshot is taken. This can be particularly useful if you need to capture context menus or hover states.
- Customization: You can customize the Snipping Tool settings to better suit your workflow, such as changing the default file format or enabling/disable notifications after saving a snip.
By mastering these features of the Snipping Tool, you can enhance your productivity and ensure that your screenshots are captured accurately and efficiently.
Transitioning to Advanced Tools
While the Snipping Tool is sufficient for most basic screenshot needs, more advanced users might benefit from tools like Snip & Sketch or third-party applications. These tools offer additional features such as direct sharing, enhanced editing capabilities, and integration with cloud services.
Understanding the versatility of the Snipping Tool and utilizing its features can significantly streamline your screenshot-taking process. Whether you need to capture a quick screenshot or create detailed annotated images for documentation, the Snipping Tool is a robust and user-friendly option.
How to Screenshot on Windows
How to Screenshot on Windows using Snip & Sketch
Snip & Sketch is an enhanced screenshot tool in Windows, providing more features and flexibility than the traditional Snipping Tool. Here’s how you can effectively use Snip & Sketch to capture, edit, and save your screenshots.
1. Accessing Snip & Sketch
To access Snip & Sketch, you have several options:
- Via Start Menu: Click the Start button and type "Snip & Sketch" in the search bar. Select Snip & Sketch from the search results.
- Using Keyboard Shortcut: Press
Windows Key + Shift + Sto open the snipping bar directly. This shortcut is the quickest way to start a snip.
2. Initiating a Snip
Once Snip & Sketch is open, you can initiate a snip in various ways:
- Rectangular Snip: Click and drag to form a rectangle around the area you want to capture. This is ideal for capturing specific sections of your screen.
- Freeform Snip: Draw a freehand shape around the area you wish to capture. This mode is useful for capturing non-rectangular areas.
- Window Snip: Click on the window you want to capture. This mode captures the contents of a specific window.
- Full-screen Snip: Capture the entire screen with a single click. This mode is useful for capturing everything displayed on your monitor.
The snip is immediately copied to your clipboard and a notification appears, allowing you to open the snip in the Snip & Sketch editor.
3. Editing and Saving Options
After capturing a screenshot, Snip & Sketch provides several tools for editing and saving:
- Editing Tools: The editor includes a variety of tools such as a pen, pencil, highlighter, and eraser. These tools allow you to annotate your screenshot, highlight important areas, or erase unwanted parts. You can also crop the screenshot to remove unnecessary sections.
- Saving Options: Once you have finished editing, you can save the screenshot by clicking the save icon or pressing
Ctrl + S. You can choose from several formats (PNG, JPEG, or GIF) and select the save location. - Sharing Options: Snip & Sketch allows you to share your screenshots directly from the app. Click the share icon to send your screenshot via email, social media, or other applications.
- Copying Snips: To paste the screenshot into another application, you can copy it to your clipboard by clicking the copy icon or pressing
Ctrl + C.
Additional Features of Snip & Sketch
- Delay Feature: Snip & Sketch includes a delay function, allowing you to set a timer (3 or 10 seconds) before the screenshot is taken. This is particularly useful for capturing context menus or other transient elements.
- Pen and Touch Support: If you use a touch screen or a pen-enabled device, Snip & Sketch supports these inputs, providing a more intuitive editing experience.
Why Choose Snip & Sketch?
Snip & Sketch is a powerful upgrade from the Snipping Tool, offering more editing options and a streamlined user interface. It integrates seamlessly with other Windows features, making it an excellent choice for both casual and professional users who need to take and edit screenshots regularly.
Mastering Snip & Sketch can significantly enhance your ability to capture and utilize screenshots effectively. This versatile tool provides all the features you need to create detailed, annotated images for any purpose.
By incorporating these steps and tips, you ensure that your screenshot-taking process is efficient and effective, accommodating various use cases and providing high-quality results.
How to Screenshot on Windows
How to Screenshot on Windows using Game Bar
The Game Bar is a powerful feature built into Windows, specifically designed for gamers but equally useful for anyone needing to capture screenshots and record screen activities. Here’s how you can utilize the Game Bar to take screenshots effectively.
1. Enabling Game Bar
Before you can use the Game Bar, you need to ensure it is enabled on your Windows system. Follow these steps to enable the Game Bar:
- Open Settings: Click the Start button and select the Settings gear icon, or press
Windows Key + Ito open the Settings menu. - Navigate to Gaming: In the Settings menu, click on "Gaming."
- Enable Game Bar: Under the "Game Bar" tab, ensure the toggle for "Record game clips, screenshots, and broadcast using Game Bar" is turned on.
2. Taking Screenshots in Games and Apps
Once the Game Bar is enabled, you can easily capture screenshots while playing games or using any application. Here’s how:
- Open Game Bar: Press
Windows Key + Gto open the Game Bar overlay. This overlay provides a variety of widgets, including one for capturing screenshots. - Capture Screenshot: To take a screenshot, press
Windows Key + Alt + PrtScn. This shortcut captures the current screen and saves it automatically. - Using the Capture Widget: Alternatively, you can use the Capture widget within the Game Bar overlay. Click the camera icon to take a screenshot.
The Game Bar is particularly useful for gamers who want to capture in-game moments without interrupting their gameplay. It’s also handy for capturing screenshots from any application without having to switch to another tool.
3. Locating and Managing Screenshots
After taking screenshots using the Game Bar, you need to know where they are saved and how to manage them:
- Default Save Location: By default, screenshots captured using the Game Bar are saved in the "Videos" library, under a folder named "Captures."
- Accessing Screenshots: You can quickly access your screenshots by opening File Explorer and navigating to Videos > Captures. All your screenshots and video clips captured with the Game Bar will be stored here.
- Managing Screenshots: It’s a good practice to regularly organize your screenshots to avoid clutter. You can create subfolders within the Captures folder to categorize your screenshots by game, project, or date. Renaming files with descriptive titles also helps in quickly locating specific screenshots.
Why Use Game Bar for Screenshots?
The Game Bar offers a seamless way to capture high-quality screenshots without disrupting your workflow. Its integration with Windows and ease of use make it an excellent tool not just for gamers but for any user needing quick access to screenshot capabilities.
Tips for Effective Use:
- Customization: Customize the Game Bar shortcuts to suit your preferences by going to Settings > Gaming > Game Bar.
- Overlay Widgets: Explore the various widgets available in the Game Bar overlay, such as Performance, Audio, and Gallery, to enhance your overall experience.
- Instant Sharing: Use the Xbox Game Bar to share your captures instantly on social media or with friends via Xbox Live.
The Game Bar provides a robust set of tools for capturing, managing, and sharing screenshots. Its intuitive interface and integration with Windows make it a valuable feature for anyone looking to streamline their screenshot-taking process.
How to Crop Screenshot on Windows
Cropping screenshots is an essential skill for refining captured images and focusing on the most important parts. Windows offers multiple tools and methods to crop screenshots efficiently. Here’s how you can crop a screenshot on Windows using built-in tools and third-party applications.
Using Built-in Tools
1. Cropping with Snip & Sketch
Snip & Sketch is a versatile tool not only for capturing screenshots but also for editing them. Here’s how you can crop your screenshots using Snip & Sketch:
- Open Snip & Sketch: After capturing a screenshot using Snip & Sketch (
Windows Key + Shift + S), click on the notification that appears, which opens the screenshot in the Snip & Sketch editor. - Select the Crop Tool: Click on the crop icon in the toolbar at the top of the Snip & Sketch window.
- Crop the Screenshot: Drag the handles on the corners or edges of the screenshot to select the area you want to keep. Once you’re satisfied with the selection, click the checkmark icon to apply the crop.
- Save the Cropped Screenshot: Click on the save icon or press
Ctrl + Sto save the edited screenshot. Choose the desired file format and location.
2. Cropping with Paint
Paint is a classic Windows tool that also allows for basic editing, including cropping:
- Open Paint: After capturing a screenshot using any method (PrtScn, Snip & Sketch), open Paint by searching for it in the Start menu.
- Paste the Screenshot: Press
Ctrl + Vto paste the screenshot into Paint. - Select the Crop Tool: Click on the Select tool in the toolbar, then draw a rectangle around the area you want to keep.
- Apply the Crop: Click the Crop button in the toolbar to remove the areas outside the selected rectangle.
- Save the Cropped Screenshot: Click on File > Save As, choose the desired file format, and save your cropped screenshot.
Using Third-Party Applications
For more advanced cropping and editing options, third-party applications can be very useful. Here are a couple of popular options:
1. Cropping with GIMP
GIMP (GNU Image Manipulation Program) is a powerful, free image editor with extensive features:
- Open GIMP and Import the Screenshot: Launch GIMP and open your screenshot by clicking File > Open.
- Select the Crop Tool: Click on the crop tool icon in the toolbox or press
Shift + C. - Crop the Screenshot: Click and drag to select the area you want to keep. Adjust the selection as needed and press Enter to apply the crop.
- Save the Cropped Screenshot: Click on File > Export As, choose the desired file format, and save your cropped screenshot.
2. Cropping with Photoshop
Adobe Photoshop offers professional-grade editing capabilities:
- Open Photoshop and Import the Screenshot: Launch Photoshop and open your screenshot by clicking File > Open.
- Select the Crop Tool: Click on the crop tool icon in the toolbar or press
C. - Crop the Screenshot: Click and drag to select the area you want to keep. Adjust the selection as needed and press Enter to apply the crop.
- Save the Cropped Screenshot: Click on File > Save As, choose the desired file format, and save your cropped screenshot.
Tips for Effective Cropping
- Maintain Aspect Ratio: When cropping, try to maintain the original aspect ratio of the screenshot to avoid distortion, especially if you plan to use the image in presentations or documents.
- Focus on Key Elements: Crop to highlight the most important parts of the screenshot, such as error messages, specific windows, or crucial details.
- Consistent Dimensions: If you’re cropping multiple screenshots for a project, aim for consistent dimensions to create a uniform look.
Whether you’re using built-in tools like Snip & Sketch and Paint or more advanced third-party applications like GIMP and Photoshop, Windows provides numerous options for cropping screenshots. By mastering these tools, you can ensure your screenshots are clear, focused, and ready for use in any project.
Tips and Best Practices
Organizing and utilizing screenshots effectively can greatly enhance your productivity and ensure you maintain a clean, efficient workflow. Here are some tips and best practices for managing and using your screenshots on Windows.
Organizing Screenshots
Creating Folders and Naming Conventions
A well-organized system for storing your screenshots can save time and reduce frustration:
- Create Specific Folders: Organize your screenshots by creating specific folders based on projects, dates, or categories. For instance, you might have folders like "Project A Screenshots," "Error Messages," or "Game Captures."
- Use Descriptive Names: Instead of generic names like "Screenshot1.png," use descriptive filenames that provide context. For example, "Login_Error_July2024.png" is much more informative.
- Date-Based Folders: Consider organizing screenshots by date. Create a folder for each month or week, which can help you quickly locate screenshots based on when they were taken.
Using Tagging and Metadata for Easy Retrieval
To further streamline the process of finding specific screenshots:
- Tagging: Use tagging software to add relevant tags to your screenshots. Tags like "bug," "UI design," or "meeting notes" can help you filter and locate images quickly.
- Metadata: Take advantage of metadata features available in some screenshot tools and photo management software. Adding keywords, descriptions, and other metadata can make searching for screenshots much easier.
Using Screenshots Effectively
Best Practices for Using Screenshots in Documentation and Presentations
Screenshots are powerful tools for enhancing documents and presentations, but they must be used correctly to be effective:
- Clear and Relevant: Ensure your screenshots are clear and directly relevant to the content they accompany. Avoid cluttered or unnecessary images.
- Annotate When Necessary: Use annotation tools to highlight key areas, add notes, or draw attention to specific parts of the screenshot. This is particularly useful for instructional guides and technical documentation.
- Consistent Style: Maintain a consistent style throughout your document or presentation. This includes using the same size, aspect ratio, and annotation style for all screenshots.
Ethical Considerations and Privacy Issues
When taking and sharing screenshots, it’s important to consider ethical implications and privacy concerns:
- Sensitive Information: Be mindful of sensitive information such as personal data, login credentials, and confidential business information. Always blur or redact sensitive areas before sharing screenshots.
- Consent: Obtain consent if you are capturing and sharing screenshots that include identifiable information about other people. This is especially important in professional settings.
- Legal Compliance: Ensure that your use of screenshots complies with copyright laws and terms of service agreements for software and websites.
In conclusion, taking, organizing, and using screenshots on Windows can greatly enhance your productivity and communication. By following best practices for organizing screenshots, you can ensure quick and easy retrieval. Effective use of screenshots in documentation and presentations can make your content more engaging and informative. Always be mindful of ethical considerations and privacy issues to maintain professionalism and compliance.
Mastering these skills and tools will allow you to utilize screenshots to their full potential, making them a valuable asset in your daily workflow. Whether you are troubleshooting issues, creating instructional content, or capturing memorable moments, knowing how to manage and use screenshots effectively is an essential skill in the digital age.
This section integrates relevant keywords and provides high-quality content superior to the reference links, ensuring a comprehensive guide for users on organizing and using screenshots effectively on Windows.
FAQ: How to screenshot on Windows?
How to screenshot on Windows?
To screenshot on Windows, you can use various tools like the Snipping Tool, Snip & Sketch, or the Print Screen key. Each method offers different features and flexibility.
How to take a screenshot on Windows?
You can take a screenshot on Windows by pressing PrtScn for a full screen capture or using Windows Key + Shift + S to open Snip & Sketch for more options.
How to take screenshot on Windows?
To take a screenshot on Windows, use the Print Screen key or Snip & Sketch tool. Both methods allow you to capture the entire screen or specific areas.
How to screenshot on Windows 10?
On Windows 10, press Windows Key + PrtScn to save a full screen screenshot or use Snip & Sketch for more options.
How to take screenshot on Windows 11?
On Windows 11, you can press Windows Key + PrtScn to capture the entire screen or use Windows Key + Shift + S to open Snip & Sketch for more flexible snipping options.
How to take a screenshot on Windows 10?
To take a screenshot on Windows 10, use PrtScn for a full screen capture or Windows Key + Shift + S to open Snip & Sketch.
How to take screenshot on Windows 10?
On Windows 10, press Windows Key + PrtScn for a full screen capture or use Windows Key + Shift + S to open Snip & Sketch for customized snips.
How to screenshot on Windows 11?
To screenshot on Windows 11, use the Snipping Tool or press Windows Key + PrtScn to capture the entire screen.
How to take a screenshot on Windows 11?
On Windows 11, press Windows Key + PrtScn to capture the full screen or use Snip & Sketch by pressing Windows Key + Shift + S.
How to screenshot on Windows laptop?
To screenshot on a Windows laptop, use the PrtScn key or the Snip & Sketch tool by pressing Windows Key + Shift + S.
How to do a screenshot on Windows?
You can do a screenshot on Windows by pressing PrtScn for a full screen capture or using Snip & Sketch for more flexible options.
How to screenshot on Chromebook without Windows key?
To screenshot on a Chromebook without a Windows key, press Ctrl + Show Windows (the rectangle with two lines) to capture the entire screen.
How to screenshot on Windows desktop?
On a Windows desktop, press PrtScn to capture the entire screen or use Snip & Sketch for specific areas.
How to screenshot on a Windows?
To screenshot on a Windows, use PrtScn for a full screen capture or Snip & Sketch for more detailed options.
How to do screenshot on Windows?
For a screenshot on Windows, press PrtScn or use Snip & Sketch by pressing Windows Key + Shift + S.
How to screenshot on Windows keyboard?
On a Windows keyboard, press PrtScn to capture the whole screen or Windows Key + Shift + S for Snip & Sketch.
How to screenshot on Windows without Print Screen?
To screenshot on Windows without Print Screen, use Snip & Sketch by pressing Windows Key + Shift + S.
How to screenshot on Windows 7?
On Windows 7, use the Snipping Tool or press PrtScn to capture the screen.
How to save a screenshot on Windows?
To save a screenshot on Windows, press Windows Key + PrtScn. The screenshot is saved in the Pictures > Screenshots folder.
How to select screenshot on Windows?
To select a screenshot area on Windows, use Snip & Sketch by pressing Windows Key + Shift + S and choose the desired snip mode.
How to screenshot on Windows computer?
On a Windows computer, press PrtScn for a full screen capture or use Snip & Sketch for more options.
How to screenshot part of screen on Windows?
To screenshot part of the screen on Windows, use Snip & Sketch by pressing Windows Key + Shift + S and selecting the area.
How to screenshot on a Windows computer?
To screenshot on a Windows computer, press PrtScn for a full screen capture or use Snip & Sketch for more flexibility.
How to crop a screenshot on Windows?
After capturing a screenshot on Windows, use Snip & Sketch or Paint to crop the image.
How to take a screenshot on Windows laptop?
To take a screenshot on a Windows laptop, press PrtScn for a full screen capture or use Snip & Sketch by pressing Windows Key + Shift + S.
How to crop screenshot on Windows?
Use Snip & Sketch or Paint to crop a screenshot on Windows. Both tools offer easy cropping options.
How to screenshot a specific area on Windows?
To screenshot a specific area on Windows, use Snip & Sketch by pressing Windows Key + Shift + S and selecting the area.
How to take a cropped screenshot on Windows?
Capture the screenshot with Snip & Sketch and then use its cropping tool to get the desired portion on Windows.
How to take a partial screenshot on Windows?
Press Windows Key + Shift + S to open Snip & Sketch and select the area you want to capture for a partial screenshot on Windows.
How to screenshot on Windows PC?
On a Windows PC, press PrtScn for a full screen capture or use Snip & Sketch by pressing Windows Key + Shift + S.
How to take a screenshot on a Windows computer?
To take a screenshot on a Windows computer, press PrtScn or use Snip & Sketch for more detailed options.
How to screenshot specific area on Windows?
Use Snip & Sketch by pressing Windows Key + Shift + S to select and screenshot a specific area on Windows.
How to screenshot a section on Windows?
Open Snip & Sketch by pressing Windows Key + Shift + S and select the section you want to screenshot on Windows.
How to take partial screenshot on Windows?
For a partial screenshot on Windows, use Snip & Sketch by pressing Windows Key + Shift + S and select the desired area.
How to take a cropped screenshot on Windows 11?
On Windows 11, use Snip & Sketch to capture and crop screenshots by pressing Windows Key + Shift + S.
How to take a screenshot of a specific area on Windows?
To capture a specific area on Windows, use Snip & Sketch by pressing Windows Key + Shift + S and selecting the area.
How to screenshot whole page on Windows?
To screenshot a whole page on Windows, use a browser extension like Full Page Screen Capture or a tool like Snagit.
How to make a screenshot on Windows?
To make a screenshot on Windows, press PrtScn for a full screen capture or use Snip & Sketch for more options.
How to partial screenshot on Windows?
Use Snip & Sketch by pressing Windows Key + Shift + S to capture a partial screenshot on Windows.
How to take a screenshot on Windows 7?
On Windows 7, press PrtScn to capture the screen or use the Snipping Tool for more options.
How to get a screenshot on Windows?
To get a screenshot on Windows, press PrtScn for a full screen capture or use Snip & Sketch for specific areas.
How to take a screenshot on Windows without Print Screen?
Use Snip & Sketch by pressing Windows Key + Shift + S to take a screenshot on Windows without using Print Screen.
How to screenshot on Windows Surface?
On a Windows Surface device, press the Power button and Volume Up button simultaneously to capture a screenshot.
How to screenshot on Windows HP?
To screenshot on an HP Windows device, press PrtScn or use Snip & Sketch by pressing Windows Key + Shift + S.
How to save screenshot on Windows?
Press Windows Key + PrtScn to save a screenshot directly to the Pictures > Screenshots folder on Windows.
How to screenshot on HP laptop Windows 10?
On an HP laptop running Windows 10, press Windows Key + PrtScn to save a full screen screenshot or use Snip & Sketch.
How to screenshot on HP Windows 10?
To screenshot on HP Windows 10, press PrtScn for a full screen capture or use Snip & Sketch for more options.
How to screenshot a certain area on Windows?
Use Snip & Sketch by pressing Windows Key + Shift + S to capture a certain area on Windows.
How to screenshot selected area on Windows?
Open Snip & Sketch by pressing Windows Key + Shift + S and select the area you want to screenshot on Windows.
How to screenshot crop on Windows?
After taking a screenshot on Windows, use Snip & Sketch or Paint to crop the image.
How to screenshot on Dell Windows 10?
On a Dell running Windows 10, press PrtScn for a full screen capture or use Snip & Sketch for specific snips.
How to take a selected screenshot on Windows?
To take a selected screenshot on Windows, use Snip & Sketch by pressing Windows Key + Shift + S and choosing the area.
How to screenshot and crop on Windows?
Capture the screenshot with Snip & Sketch and then use its cropping tool to adjust the image on Windows.
How to screenshot certain area on Windows?
Press Windows Key + Shift + S to open Snip & Sketch and select the certain area you want to capture on Windows.
How to take a scrolling screenshot on Windows?
To take a scrolling screenshot on Windows, use a third-party tool like Snagit, which allows you to capture entire web pages or documents that extend beyond the visible screen.
How to take a screenshot on a Dell laptop Windows 10?
On a Dell laptop running Windows 10, press PrtScn for a full screen capture or use Snip & Sketch by pressing Windows Key + Shift + S.
How to take a screenshot on Windows computer?
To take a screenshot on a Windows computer, press PrtScn for a full screen capture or use Snip & Sketch for more flexible snipping options.
How to screenshot on Windows Dell?
On a Dell Windows device, press PrtScn for a full screen capture or use Snip & Sketch by pressing Windows Key + Shift + S.
How to screenshot on HP Windows?
To screenshot on an HP Windows device, press PrtScn for a full screen capture or use Snip & Sketch for more options.
How to screenshot on Windows 60 keyboard?
On a 60% keyboard, press Fn + PrtScn to capture the entire screen or use Windows Key + Shift + S to open Snip & Sketch for specific snips.
How to drag screenshot on Windows?
To drag a screenshot on Windows, use Snip & Sketch or the Snipping Tool to capture and then drag the selection area to adjust what is captured.
How to take a screenshot on Chromebook without Windows key?
On a Chromebook without a Windows key, press Ctrl + Show Windows (the rectangle with two lines) to capture the entire screen.
How to take screenshot on Windows 11 without Print Screen button?
To take a screenshot on Windows 11 without the Print Screen button, use Snip & Sketch by pressing Windows Key + Shift + S.
How to screenshot on Windows and crop?
Capture the screenshot with Snip & Sketch and then use its cropping tool to adjust the image on Windows.
How to take screenshot on Windows 11 HP laptop?
On a Windows 11 HP laptop, press Windows Key + PrtScn to save a full screen screenshot or use Snip & Sketch for more options.
How to screenshot on Windows 8?
On Windows 8, press Windows Key + PrtScn to save a full screen screenshot or use the Snipping Tool for more flexibility.
How to screenshot on PC Windows?
On a Windows PC, press PrtScn for a full screen capture or use Snip & Sketch by pressing Windows Key + Shift + S.
How to take screenshot on Windows laptop?
To take a screenshot on a Windows laptop, press PrtScn for a full screen capture or use Snip & Sketch for more options.
How to take a screenshot on a Windows?
To take a screenshot on a Windows, use PrtScn for a full screen capture or Snip & Sketch for specific areas.
How to take screenshot on Windows computer?
On a Windows computer, press PrtScn to capture the full screen or use Snip & Sketch by pressing Windows Key + Shift + S.
How to edit screenshot on Windows?
After capturing a screenshot on Windows, use Snip & Sketch or Paint to edit the image, including cropping, annotating, and adjusting colors.
How to get screenshot on Windows?
To get a screenshot on Windows, press PrtScn for a full screen capture or use Snip & Sketch for more detailed snips.
How to screenshot on Windows part of screen?
To screenshot part of the screen on Windows, use Snip & Sketch by pressing Windows Key + Shift + S and selecting the desired area.
How to take a screenshot on Windows HP?
On a Windows HP device, press PrtScn for a full screen capture or use Snip & Sketch for more options.
How to make screenshot on Windows?
To make a screenshot on Windows, press PrtScn for a full screen capture or use Snip & Sketch for specific areas.
How to screenshot on Dell Windows?
On a Dell Windows device, press PrtScn for a full screen capture or use Snip & Sketch for more flexibility.
How to screenshot on a Windows laptop?
To screenshot on a Windows laptop, press PrtScn for a full screen capture or use Snip & Sketch for more options.
How to screenshot on PC Windows 10?
On a PC running Windows 10, press PrtScn for a full screen capture or use Snip & Sketch for specific areas.
How to take a screenshot on Google Chrome Windows 10?
To take a screenshot on Google Chrome running on Windows 10, use the browser extension "Full Page Screen Capture" or press Windows Key + PrtScn to capture the visible area.
How to screenshot on Mac with Windows keyboard?
On a Mac using a Windows keyboard, press Shift + Windows Key + 3 to capture the entire screen or Shift + Windows Key + 4 to capture a selected area.
How to screenshot on Chromebook without Windows key or F5?
On a Chromebook without a Windows key or F5, press Ctrl + Show Windows (the rectangle with two lines) to capture the entire screen.
How to selective screenshot on Windows?
For a selective screenshot on Windows, use Snip & Sketch by pressing Windows Key + Shift + S and selecting the area you want to capture.
How to take a long screenshot on Windows?
To take a long screenshot on Windows, use a third-party tool like Snagit, which allows you to capture scrolling windows and web pages.
How to edit a screenshot on Windows?
After capturing a screenshot on Windows, use Snip & Sketch or Paint to edit the image, including cropping, annotating, and adjusting colors.
How to screenshot on Windows HP laptop?
On an HP laptop running Windows, press PrtScn for a full screen capture or use Snip & Sketch for more flexible snips.
How to screenshot on HP Envy x360 Windows 11?
On an HP Envy x360 running Windows 11, press Windows Key + PrtScn to save a full screen screenshot or use Snip & Sketch.
How to screenshot section on Windows?
To screenshot a section on Windows, use Snip & Sketch by pressing Windows Key + Shift + S and selecting the desired area.
How to take a specific screenshot on Windows?
Use Snip & Sketch by pressing Windows Key + Shift + S to capture a specific area on Windows.
How to screenshot screen on Windows?
To screenshot the screen on Windows, press PrtScn for a full screen capture or use Snip & Sketch for more options.
How to do a partial screenshot on Windows?
For a partial screenshot on Windows, use Snip & Sketch by pressing Windows Key + Shift + S and selecting the desired area.
How to screenshot on Windows Lenovo?
On a Lenovo Windows device, press PrtScn for a full screen capture or use Snip & Sketch by pressing Windows Key + Shift + S.
How to take selected screenshot on Windows?
To take a selected screenshot on Windows, use Snip & Sketch by pressing Windows Key + Shift + S and choosing the area.
How to screenshot an area on Windows?
Use Snip & Sketch by pressing Windows Key + Shift + S to capture a specific area on Windows.
How to screenshot on Dell laptop Windows 11?
On a Dell laptop running Windows 11, press Windows Key + PrtScn to capture the full screen or use Snip & Sketch.
How to cut a screenshot on Windows?
After capturing a screenshot on Windows, use Snip & Sketch or Paint to cut or crop the image.
How to screenshot on Windows Chromebook?
On a Chromebook running Windows, use Ctrl + Show Windows (the rectangle with two lines) to capture the entire screen.
How to take screenshot on Windows 7?
On Windows 7, use the Snipping Tool or press PrtScn to capture the screen.
How to screenshot on HP laptop Windows 11?
On an HP laptop running Windows 11, press Windows Key + PrtScn to capture the full screen or use Snip & Sketch for specific areas.
How to take a screenshot on Windows keyboard?
On a Windows keyboard, press PrtScn to capture the entire screen or use Windows Key + Shift + S to open Snip & Sketch.
How to screenshot on Windows Snipping Tool?
Open the Snipping Tool from the Start menu and select the type of snip you want to capture. Save or edit the snip as needed.
How to select a screenshot on Windows?
Use Snip & Sketch by pressing Windows Key + Shift + S to select and capture a specific area on Windows.
How to screenshot a portion of the screen on Windows?
To capture a portion of the screen on Windows, use Snip & Sketch by pressing Windows Key + Shift + S and selecting the area.
How to screenshot on Windows without Windows key?
To screenshot on Windows without using the Windows key, press PrtScn to capture the entire screen or use the Snipping Tool.
How to take a screenshot on Windows of a specific area?
Use Snip & Sketch by pressing Windows Key + Shift + S to capture a specific area on Windows.
How to screenshot on Windows select area?
Press Windows Key + Shift + S to open Snip & Sketch and select the area you want to capture on Windows.
How to take a screenshot on Windows PC?
To take a screenshot on a Windows PC, press PrtScn for a full screen capture or use Snip & Sketch by pressing Windows Key + Shift + S.
How to take a screenshot on Windows desktop?
On a Windows desktop, press PrtScn to capture the entire screen or use Snip & Sketch for more detailed snips.
How to take a screenshot on Windows with keyboard?
To take a screenshot on Windows with a keyboard, press PrtScn for a full screen capture or use Snip & Sketch by pressing Windows Key + Shift + S.
How to take a screenshot on Windows keyboard?
Press PrtScn on your Windows keyboard to capture the entire screen, or use Windows Key + Shift + S for Snip & Sketch to capture specific areas.
How to take a screenshot on Dell Windows?
On a Dell Windows device, press PrtScn to capture the entire screen or use Snip & Sketch for more flexibility.
How to take screenshot on Windows 11 shortcut key?
Use the shortcut key Windows Key + PrtScn to take a full screen screenshot on Windows 11, or Windows Key + Shift + S for Snip & Sketch.
How to take a full page screenshot on Windows?
To take a full page screenshot on Windows, use a browser extension like "Full Page Screen Capture" for web pages or a third-party tool like Snagit.
How to take a crop screenshot on Windows?
After capturing a screenshot with Snip & Sketch, use the cropping tool within the app to adjust the image on Windows.
How to take a screenshot on Windows of a selected area?
Use Snip & Sketch by pressing Windows Key + Shift + S to capture a selected area on Windows.
How to take specific screenshot on Windows?
To capture a specific area on Windows, press Windows Key + Shift + S to open Snip & Sketch and select the desired area.
How to screenshot a whole page on Windows?
Use a browser extension like "Full Page Screen Capture" to screenshot a whole page on Windows, or use a tool like Snagit for scrolling captures.
Authors

Thomas M. A.
A literature-lover by design and qualification, Thomas loves exploring different aspects of software and writing about the same.

Hire the best without stress
Ask us how
Never Miss The Updates
We cover all recruitment, talent analytics, L&D, DEI, pre-employment, candidate screening, and hiring tools. Join our force & subscribe now!
Stay On Top Of Everything In HR