How to Screen Record on iPhone?
Published on June 4th, 2024

Screen recording on an iPhone is a straightforward process that allows you to capture your screen activities, whether for creating tutorials, sharing gameplay, or saving video calls. Follow this step-by-step guide to learn how to screen record on your iPhone.
Step-by-Step Guide on How to Screen Record on iPhone
Accessing the Control Center
To start screen recording, you first need to access the Control Center. The method to do this depends on your iPhone model:
- iPhones with Face ID (iPhone X and later): Swipe down from the upper-right corner of the screen. This gesture will bring down the Control Center, where you can access various quick settings.
- iPhones with a Home button (iPhone 8 and earlier): Swipe up from the bottom edge of the screen to access the Control Center. This method is intuitive and ensures that you have quick access to essential controls.
Locating the Screen Recording Option
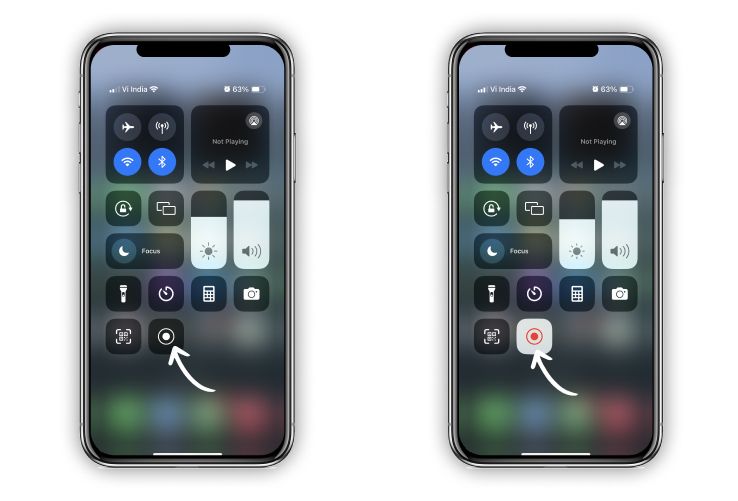
Once you have the Control Center open, look for the screen recording icon. This icon is represented by a circle with a dot inside, making it easily recognizable among other controls.
Initiating the Screen Recording
To begin recording your screen, follow these steps:
- Tap the Screen Recording Icon: Simply tap the screen recording icon in the Control Center. Upon tapping, a three-second countdown timer will appear on the screen, giving you a brief moment to prepare for the recording.
Starting the Recording
During the countdown, you can choose to enable or disable microphone audio:
- Enable Microphone Audio: To include audio in your screen recording, press and hold the screen recording icon in the Control Center. This action will reveal a microphone icon. Tap the microphone icon to turn it on. This is particularly useful if you want to narrate your actions or include external sounds in the recording.
Recording the Screen
Your iPhone will now start recording everything displayed on the screen. This includes any interactions, swipes, and actions performed on your device. The recording will continue until you manually stop it.
Ending the Recording
To stop the screen recording, you have two options:
- Tap the Red Status Bar: A red status bar or red bubble will appear at the top of your screen indicating that the recording is in progress. Tap this bar, and a prompt will appear asking if you want to stop the recording. Confirm to end the recording.
- Return to the Control Center: Swipe down (or up, depending on your iPhone model) to open the Control Center again and tap the screen recording icon. This will also stop the recording.
Your recorded video will be automatically saved to the Photos app, where you can view, edit, and share it as needed.
Additional Tips to Screen Record on iPhone
To enhance your screen recording experience on your iPhone, consider the following additional tips. These tips will help you make the most out of the screen recording feature, including enabling audio recording, editing your recordings, and using screen recording in different apps and scenarios.
Enable Screen Recording with Audio
Including audio in your screen recording can be essential for various reasons, such as providing voice-over commentary, capturing in-app sounds, or recording conversations during video calls. Here's how to enable microphone audio recording:
- Access the Control Center: Swipe down from the upper-right corner (for iPhones with Face ID) or swipe up from the bottom edge of the screen (for iPhones with a Home button).
- Press and Hold the Screen Recording Icon: Locate the screen recording icon (a circle with a dot inside) and press and hold it.
- Turn On the Microphone: A menu will appear with a microphone icon at the bottom. Tap the microphone icon to turn it on. The icon will turn red, indicating that the microphone audio is enabled.
- Start Recording: Tap "Start Recording" to begin capturing both your screen and audio.
Enabling audio recording allows you to create more comprehensive and informative screen recordings, making it perfect for tutorials, demonstrations, or recording important conversations.
Edit the Recorded Video
After recording your screen, you might want to edit the video to remove unnecessary parts, add annotations, or enhance the overall quality. You can edit your screen recordings using the built-in Photos app or third-party editing apps. Here's how:
Using the Photos App:
- Open the Photos App: Locate and open the Photos app on your iPhone.
- Select Your Recording: Find the screen recording you want to edit and tap on it.
- Tap "Edit": In the upper-right corner, tap the "Edit" button.
- Trim or Adjust: Use the sliders to trim the beginning or end of the video. You can also apply filters, adjust the exposure, and make other basic edits.
- Save Your Edits: Once you're satisfied with your edits, tap "Done" to save the changes.
Using Third-Party Apps:
- iMovie: A powerful video editing app by Apple, available for free on the App Store. It offers more advanced editing features, such as adding text, transitions, and music.
- Adobe Premiere Rush: Another excellent option for editing videos on your iPhone, providing a wide range of professional tools and effects.
Editing your screen recordings can significantly improve their quality and make them more engaging for viewers. Whether you're creating a tutorial, a gameplay video, or a presentation, edited videos tend to look more polished and professional.
Use Screen Recording in Different Apps
Screen recording on your iPhone isn't limited to just the home screen or basic functionalities. You can use screen recording in various apps and scenarios to capture specific actions or events. Here are some examples:
- Gameplay: Record your gameplay to share with friends or upload to social media platforms like YouTube. This is especially popular among gamers who want to showcase their skills or provide game walkthroughs.
- Social Media: Capture content from apps like Instagram, TikTok, or Snapchat to save your favorite moments or create tutorials on how to use these platforms.
- Video Calls: Record video calls on apps like FaceTime, Zoom, or Skype. This can be useful for saving important conversations or creating tutorials on using these video conferencing tools.
- App Tutorials: Create step-by-step guides on how to use different apps, whether for productivity, entertainment, or education. This is particularly useful for educators and tech support.
By utilizing the screen recording feature in different apps, you can create diverse and valuable content for various purposes. Whether it's for personal use, sharing with friends, or creating professional tutorials, screen recording on your iPhone is a versatile tool.
Troubleshooting Screen Recording Issues
While screen recording on an iPhone is typically a seamless process, you might occasionally encounter issues. This section provides troubleshooting steps for common screen recording problems, ensuring you can resolve them quickly and continue capturing your screen effectively.
Recording Not Working
If your screen recording feature isn't working, follow these steps to troubleshoot and resolve the issue:
Check Screen Time Settings: Sometimes, screen recording might be restricted by Screen Time settings. To check and modify these settings:
- Open Settings and navigate to Screen Time.
- Tap Content & Privacy Restrictions.
- Go to Content Restrictions and ensure that Screen Recording is set to Allow.
Restart Your iPhone: A simple restart can often resolve minor software glitches that might be affecting screen recording. To restart your iPhone:
- For iPhones with Face ID: Press and hold the side button along with either volume button until the power off slider appears. Drag the slider to turn off your iPhone, then press and hold the side button again to turn it back on.
- For iPhones with a Home button: Press and hold the side or top button until the power off slider appears. Drag the slider, then press and hold the side or top button to turn it back on.
Update iOS: Ensure your iPhone is running the latest version of iOS, as updates often include bug fixes and improvements that can resolve issues with screen recording.
- Go to Settings > General > Software Update. If an update is available, tap Download and Install.
Reset All Settings: If the above steps don’t work, you can reset all settings. This won’t delete your data but will reset system settings like Wi-Fi passwords and wallpaper.
- Go to Settings > General > Reset > Reset All Settings.
Free Up System Resources: Ensure no other demanding apps are running in the background, which might be affecting your device’s performance. Close any unnecessary apps to free up resources.
Low Storage
Screen recordings can take up significant storage space, especially if you’re recording high-resolution videos. If your screen recording is interrupted due to low storage, follow these steps to free up space:
Check Available Storage: Monitor your iPhone’s storage to ensure you have enough space for screen recordings.
- Go to Settings > General > iPhone Storage. This will show you a breakdown of how your storage is being used.
Delete Unused Apps: Remove apps that you no longer use to free up space.
- From the iPhone Storage screen, tap on an app and select Delete App.
Clear Out Old Videos and Photos: Photos and videos can consume a large amount of storage. Delete items you no longer need.
- Open the Photos app, go to Albums > Recently Deleted, and delete the items permanently.
Offload Unused Apps: Offloading apps allows you to save storage by deleting the app but keeping its documents and data.
- Go to Settings > General > iPhone Storage, tap on an app, and select Offload App.
Use Cloud Storage: Move your photos, videos, and other large files to cloud storage services like iCloud, Google Drive, or Dropbox.
- Enable iCloud Photos by going to Settings > Photos > iCloud Photos.
Clear Cache and Data: Some apps, particularly social media and streaming apps, can accumulate cache and data over time.
- Open the app settings for each app and look for options to clear cache or data.
By following these troubleshooting steps, you can resolve common issues with screen recording on your iPhone, ensuring a smooth and uninterrupted recording experience. Whether it's fixing a malfunction or freeing up storage, these solutions will help you make the most of the screen recording feature on your iPhone.
Screen recording on an iPhone is a highly versatile feature that can be utilized for a multitude of purposes, from creating instructional videos to capturing memorable moments during gameplay or video calls. Here’s a recap of the steps and benefits of screen recording on an iPhone, along with some encouragement to explore and make the most of this useful tool.
Summary
To screen record on your iPhone, follow these simple steps:
- Access the Control Center: Swipe down from the upper-right corner for iPhones with Face ID, or swipe up from the bottom for models with a Home button.
- Locate the Screen Recording Icon: Look for the screen recording icon, which is a circle with a dot inside.
- Initiate the Screen Recording: Tap the screen recording icon to start recording. To include audio, press and hold the icon, then tap the microphone icon to enable it.
- Start Recording: After a three-second countdown, your screen recording will begin.
- Stop Recording: Tap the red status bar at the top of the screen and confirm to stop the recording. Your video will be saved in the Photos app.
Benefits of Screen Recording on iPhone
- Create Tutorials: Perfect for educators, tech support, and content creators who need to demonstrate app functionalities or provide step-by-step guides.
- Capture Gameplay: Ideal for gamers who want to share their achievements, create walkthroughs, or document gameplay for analysis.
- Save Video Calls: Useful for recording important conversations during FaceTime, Zoom, or Skype calls for future reference or sharing with others.
- Troubleshooting: Record issues on your iPhone to share with tech support for more accurate troubleshooting.
- Share Memorable Moments: Easily capture and share moments from social media apps or other applications.
Encouragement
The screen recording feature on your iPhone is a powerful tool that can greatly enhance your digital interactions and content creation. Whether you are a professional looking to create instructional videos, a gamer eager to share your gameplay, or simply someone who wants to document and share special moments, screen recording offers a simple and effective solution.
We encourage you to explore the screen recording feature on your iPhone and experiment with its various applications. By doing so, you can unlock new ways to communicate, educate, entertain, and share with others. The ease of use and the high-quality recordings make it a valuable addition to your digital toolkit.
So go ahead, start screen recording on your iPhone today and discover the endless possibilities it brings. If you encounter any issues or have tips to share, feel free to leave a comment below. Happy recording!
FAQ: How to screen record on iPhone?
1. How do I access the Control Center to start screen recording?
On iPhones with Face ID, swipe down from the upper-right corner. For iPhones with a Home button, swipe up from the bottom edge of the screen.
2. Can I record my screen with audio?
Yes, activate audio by pressing and holding the screen recording icon in the Control Center and tapping the microphone icon.
3. Where can I find the screen recording after I stop it?
The video is saved automatically to the Photos app under the Recents or Screen Recordings album.
4. Does screen recording affect the performance of my iPhone?
It may impact performance slightly, especially on older models, due to processing power and storage use.
5. Can I pause and resume a screen recording?
iOS does not currently support pausing and resuming screen recordings; you can only start and stop.
6. What should I do if my screen recording stops unexpectedly?
Check for sufficient storage space, ensure no restrictions are enabled, and consider restarting your iPhone or updating iOS if problems persist.
7. How do I add the screen recording feature to my Control Center?
Go to Settings > Control Center > Customize Controls, then tap the plus icon next to Screen Recording.
8. How to screen record with sound on various iPhone models?
For any iPhone model, press and hold the screen recording icon in the Control Center and tap the microphone icon to enable sound.
9. How do different iPhone models like iPhone 11, iPhone 12, etc., affect screen recording steps?
The steps to initiate screen recording are the same across all models that support it; differences only arise in accessing the Control Center based on whether the iPhone has a Home button or uses Face ID.
10. What are the implications of screen recording in terms of legality and privacy, especially during calls or on apps like Snapchat?
Be aware that recording calls and certain app contents can have legal and privacy implications. Always inform other parties if you are recording, and check app notifications (like Snapchat, which notifies users when the screen is being recorded).
11. Can I record streaming content from services like Netflix or Hulu on my iPhone?
Most streaming services employ DRM (Digital Rights Management) that prevents recording their content, often resulting in a black screen in recordings.
12. How do I manage storage when frequently recording my screen?
Monitor your iPhone's storage through Settings > General > iPhone Storage and manage old recordings by deleting or transferring them to other storage solutions.
13. Are there any third-party apps recommended for enhanced screen recording features?
Apps like ScreenFlow or DU Recorder offer additional features like editing and more control over video resolution and audio settings.
14. What troubleshooting steps should I take for common screen recording issues?
Ensure your device has enough storage and battery life, check for iOS updates, and restart your device if you encounter issues.
Authors

Thomas M. A.
A literature-lover by design and qualification, Thomas loves exploring different aspects of software and writing about the same.

Hire the best without stress
Ask us how
Never Miss The Updates
We cover all recruitment, talent analytics, L&D, DEI, pre-employment, candidate screening, and hiring tools. Join our force & subscribe now!
Stay On Top Of Everything In HR